

Showing posts with label sweater. Show all posts
Showing posts with label sweater. Show all posts
Monday, January 16, 2012
Sneak Peak at Upcoming Tutorial!
Just a fast sneak peak of what you can look forward to seeing soon!


Thursday, March 31, 2011
Diy Sweater Shorts Tutorial

Start with a sweater that is too big for you- something with a pattern or texture to it is best as it's way more fun!

Next get a pair of shorts or pants that you can slip on and off without any elastic or buttons or zippers or anything.
Fold them in half and lay them on your sweater so that the inseam is in the center.

Trace around your shorts and cut out the pattern. Use the first piece you cut out and use it to cut out the second piece. You should have two pieces like this.

Open up your two pieces so that they look like this and sew down the curve line.

If you don't have a serger use a straight stitch, then interlock your seams using a zig zag stitch along the edge. Remember that the thicker your fabric is the longer your stitch length should be.

Next sew your legs shut- start at the center crotch and work to the end.

Cut out two rectangle pieces the width of your shorts by 4 inches. Sew the two pieces together. (This will be your waist band)

Fold your tube in half width-wise and sew to your shorts.


And you're done!


Thursday, January 27, 2011
Rockabilly Swallow Sweater
I suspect by now you all know my obsession with knits and with Rockabilly fashion, to this shouldn't be a huge surprise.


Thie sweater started out as a huge slouchy Gem Sweater. You can guess how frightening that was.

So I started by removing all the beads and thread and giving it a really good wash.
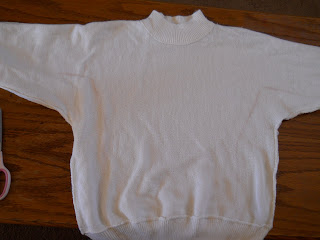
Because I'm not a slouch sweater kind of girl I used a fitted sweater as a template for cutting this sweater down to size so it fits me pretty neatly now.

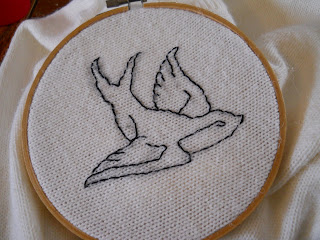
And because I really wanted a Swallow sweater. I broke out my embroidery floss and free-handed two swallows on my sweater.
Before you choke I used a referance image.



Thie sweater started out as a huge slouchy Gem Sweater. You can guess how frightening that was.

So I started by removing all the beads and thread and giving it a really good wash.

Because I'm not a slouch sweater kind of girl I used a fitted sweater as a template for cutting this sweater down to size so it fits me pretty neatly now.

And because I really wanted a Swallow sweater. I broke out my embroidery floss and free-handed two swallows on my sweater.
Before you choke I used a referance image.


Thursday, December 30, 2010
DIY 1960s Inspired Sweater Dress
Start with a man's super huge sweater! I made mine using an XL and it came out as short as they would have probably worn in the 60s- but I would have gone larger if I had a 1X or a 2X laying around.

Lay your sweater out flat and make sure the bottom hem is lined up front and back.
Place a tank top on the front center trace around it Be sure to leave room for seam allowance.


Measure about 2 inches below your bust (for me this was about 10 1/2 inches) Mark a straight line across your pattern at this point.

Cut out around your tank pattern and across where you marked your line.


Pin the front piece of your top to the front piece of your bottom. Repeat for the back and sew along that line.
Rembember that the thicker your fabric the wider your stitch length should be. So if you are using a thick sweater you will want a longer stitch length than average.

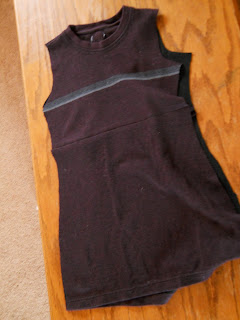
Flip your dress inside out and pin the sides together (I recommend starting at the bottom and working up) Sew along pin lines.

Take the sleeves from your sweater and mark out new sleeves being sure to give a little extra for seam allowance.


Use your first sleeve to make a pattern for your second. I made my sleeves quarter length and wanted them to be fitted. Be sure to measure around your arm where you want your sleeve to stop at so it can taper to that point.
Sew along line to close your sleeves.

Pin and hem your sleeves.

Pin and sew sleeves inside sleeve holes.

Add a bow on the center front where you sewed a bust line and you are done!


Lay your sweater out flat and make sure the bottom hem is lined up front and back.
Place a tank top on the front center trace around it Be sure to leave room for seam allowance.


Measure about 2 inches below your bust (for me this was about 10 1/2 inches) Mark a straight line across your pattern at this point.

Cut out around your tank pattern and across where you marked your line.


Pin the front piece of your top to the front piece of your bottom. Repeat for the back and sew along that line.
Rembember that the thicker your fabric the wider your stitch length should be. So if you are using a thick sweater you will want a longer stitch length than average.


Flip your dress inside out and pin the sides together (I recommend starting at the bottom and working up) Sew along pin lines.

Take the sleeves from your sweater and mark out new sleeves being sure to give a little extra for seam allowance.


Use your first sleeve to make a pattern for your second. I made my sleeves quarter length and wanted them to be fitted. Be sure to measure around your arm where you want your sleeve to stop at so it can taper to that point.
Sew along line to close your sleeves.

Pin and hem your sleeves.

Pin and sew sleeves inside sleeve holes.

Add a bow on the center front where you sewed a bust line and you are done!


Friday, October 8, 2010
Circle Scarf
I made this a few days ago, but I only just now uploaded it so I'm sorry for that delay.
This is another part of the non-knitted knitted items I'm making. I used the scrap piece from the vest that I made a week or two ago to make this little scarf. I like it lots and hopefully you will too!


This is realy easy and should only take about 15 minutes.
This is the piece I started with.

Cut your piece into strips. They should be kind of wide but still longer than they are wide. I didn't do anything aprox. because I felt that wasn't really important.


Next fold one of your strips in half, right sides together and sew to make it into a loop.

Turn right side out and take a second piece. Thread it through your loop and sew it together with right sides together.

Turn that loop right side out and you should have something like this.

Repeat until you've used all but the last piece. When you get to your last piece, loop it through both the last link and the first link so you have a full circle.

Sew and you are done! The scarf/necklace should easily fit over your head because it's a knit so it should stretch.
This is another part of the non-knitted knitted items I'm making. I used the scrap piece from the vest that I made a week or two ago to make this little scarf. I like it lots and hopefully you will too!


This is realy easy and should only take about 15 minutes.
This is the piece I started with.

Cut your piece into strips. They should be kind of wide but still longer than they are wide. I didn't do anything aprox. because I felt that wasn't really important.


Next fold one of your strips in half, right sides together and sew to make it into a loop.

Turn right side out and take a second piece. Thread it through your loop and sew it together with right sides together.

Turn that loop right side out and you should have something like this.

Repeat until you've used all but the last piece. When you get to your last piece, loop it through both the last link and the first link so you have a full circle.

Sew and you are done! The scarf/necklace should easily fit over your head because it's a knit so it should stretch.
Wednesday, September 29, 2010
Cropped Sweater Vest
I promise I'm not ignoring you guys. I've been super busy with projects that NEED to get done so that's why I've been off in la la land and haven't been doing the tutorials. So I'm going to do a really fast one right now b ecause its 1 a.m. and I feel I owe you all.
Ok so here is today's project.


So I started with this old 1990s red hooded sweater with a hood. Pretty Buffy Summers but I want to go for that Faith look instead.

The first thing that needed to be done was to remove the zipper. The zipper gave me a pre-hem along the front so I didn't have to worry about hemming the center. If you are using a regular sweater you will need to cut open the middle of your sweater and hem it.
I then removed the sleeves and using my sewing machine, I set the stich to a zig-zag stich with a very low stitch length of 1. I then sewed around the sleeve holes, stretching the fabric as I went to give it a finished edge.


Next I determined how short I wanted my vest to be and using a straight edge cut said line.

I stiched along this edge using the same process as before.

And that was it, one knitted vest without me ever having to knit a stitch. Pretty easy huh?
Ok so here is today's project.


So I started with this old 1990s red hooded sweater with a hood. Pretty Buffy Summers but I want to go for that Faith look instead.

The first thing that needed to be done was to remove the zipper. The zipper gave me a pre-hem along the front so I didn't have to worry about hemming the center. If you are using a regular sweater you will need to cut open the middle of your sweater and hem it.
I then removed the sleeves and using my sewing machine, I set the stich to a zig-zag stich with a very low stitch length of 1. I then sewed around the sleeve holes, stretching the fabric as I went to give it a finished edge.


Next I determined how short I wanted my vest to be and using a straight edge cut said line.

I stiched along this edge using the same process as before.

And that was it, one knitted vest without me ever having to knit a stitch. Pretty easy huh?
Subscribe to:
Posts (Atom)